
今回 Confluence API を触ることがあったけど、日本語のドキュメントがなかったのと、
トークンの取得->API 叩くまでのフローが体型的にまとまってない & 公式ドキュメントがわかりづらかったので、今回自己流にまとめる。
またドキュメントに載っていない情報もあるので、それもまとめる
ただ、自分は Confluence 自体を触ることがほとんどないので、あんまりニーズとマッチしないかも
基本的な oauth フローや oauth で取得したトークンを利用した API リクエストの方法については説明しません。
具体的には、以下の内容を扱います。
トークンの取得
- Confluence の設定画面に行く
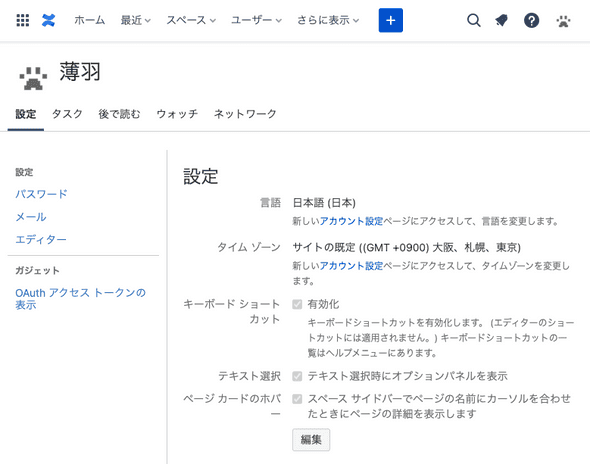
- パスワード
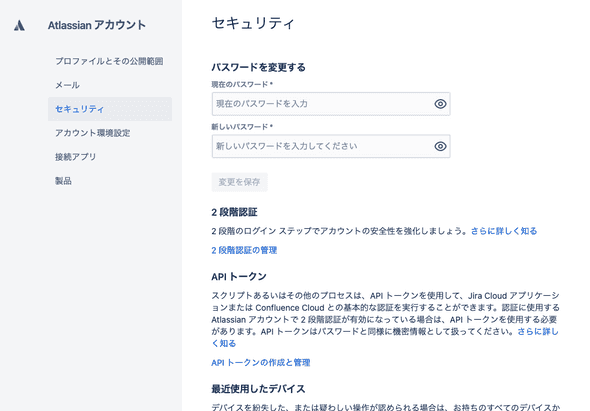
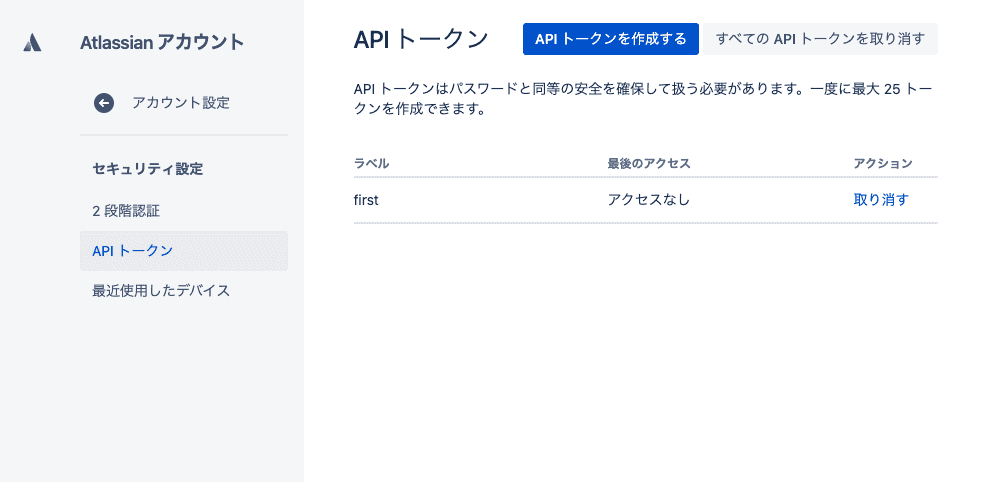
- セキュリティ)API トークン

- API トークンの作成するボタンからトークンを作成できる

Oauth でトークンの取得
- ディベロッパーコンソールにアクセスします。https://developer.atlassian.com/console
- Create ボタン > OAuth 2.0 integration から Confluence アプリを作成できます
- 次にスコープを設定します。アプリの管理画面 > Permisisons > Confluence API Add/Configure > Edit scope から編集します。
- スコープの詳細はここから確認できます。必要なスコープを設定してください。https://developer.atlassian.com/cloud/confluence/scopes-for-oauth-2-3LO-and-forge-apps/
- Oauth トークンの取得は、Jira での公式の例を流用して行えます。 https://github.com/atlassian-api/atlassian-python-api/blob/master/examples/jira/jira_oauth2.py
from requests_oauthlib import OAuth2Session
from atlassian import Confluence
from flask import Flask, request, redirect, session
import requests

app = Flask(__name__)
app.secret_key = ""

# JIRA OAuth URLs
authorization_base_url = "https://auth.atlassian.com/authorize"
token_url = "https://auth.atlassian.com/oauth/token"


client_id = "{client_id}"
client_secret = "{client_secret}"
redirect_uri = "{callback}"

@app.route("/login")
def login():
    scope = ["read:page:confluence","read:attachment:confluence","read:blogpost:confluence",
    "read:custom-content:confluence","read:comment:confluence","read:group:confluence",
    "read:configuration:confluence","read:space:confluence","read:space.permission:confluence",
    "read:space.property:confluence","read:space.setting:confluence","read:content.permission:confluence",
    "read:content.property:confluence","read:content.restriction:confluence","read:content.metadata:confluence",
     "read:content-details:confluence", "read:space-details:confluence",
     "read:user:confluence", "read:space:confluence", "offline_access"]
    audience = "api.atlassian.com"

    oauth = OAuth2Session(client_id, scope=scope, redirect_uri=redirect_uri)
    authorization_url, state = oauth.authorization_url(
        authorization_base_url,
        audience=audience,
    )
    session["oauth_state"] = state
    return redirect(authorization_url)

@app.route("/callback")
def callback():
    jira_oauth = OAuth2Session(client_id, state=session["oauth_state"], redirect_uri=redirect_uri)
    token_json = jira_oauth.fetch_token(token_url, client_secret=client_secret, authorization_response=request.url)
    with open("token.json", "w") as f:
        f.write(str(token_json).replace("'", '"'))

    # return "Token: {}<p />Projects: {}".format(token_json, ", ".join(get_projects(token_json)))
    return "Token: {}<p />".format(token_json)

def get_projects(token_json):
    req = requests.get(
        "https://api.atlassian.com/oauth/token/accessible-resources",
        headers={
            "Authorization": "Bearer {}".format(token_json["access_token"]),
            "Accept": "application/json",
        },
    )
    req.raise_for_status()
    resources = req.json()
    cloud_id = resources[0]["id"]

    oauth2_dict = {
        "client_id": client_id,
        "token": {
            "access_token": token_json["access_token"],
            "token_type": "Bearer",
        },
    }
    jira = Jira(url="https://api.atlassian.com/ex/jira/{}".format(cloud_id), oauth2=oauth2_dict)
    return [project["name"] for project in jira.projects()]

app.secret_key = "{secret_key}"
app.run(host="localhost", port=8080, ssl_context=('crt_path', 'key_path'), threaded=True, debug=True)
以降の api へのリクエストはここで取得した token を使って行います。
ここで注意して欲しいのは、取得したトークンの有効期限は 1 時間です。
1時間後に有効期限が切れてしまいます。
1時間後にはトークンの再取得か、 期限が切れたトークンの refresh が必要です。
期限切れに際してのトークンの更新
公式ドキュメント・詳細はこちらにあります。 https://developer.atlassian.com/cloud/confluence/oauth-2-3lo-apps/#faq1
トークンの更新のために、offline_access を追加します。
これは、アプリ管理画面のスコープ管理にはないので、Oauth 認証フローの scope に追加します。
これを追加することで、トークンと同時にrefresh tokenが取得できます。
このrefresh tokenを使って、新たに認証し直さなくても新しくトークンを取得できます。
具体的には、以下のエンドポイントを叩くと、新しいトークンと、新しい refresh token、有効時間等の情報が返ってきます。
curl --request POST \
  --url 'https://auth.atlassian.com/oauth/token' \
  --header 'Content-Type: application/json' \
  --data '{ "grant_type": "refresh_token", "client_id": "YOUR_CLIENT_ID", "client_secret": "YOUR_CLIENT_SECRET", "refresh_token": "YOUR_REFRESH_TOKEN" }'
cloud id について
あと一歩で実際に API 叩いて記事を取得できます!
公式ドキュメントはこちらです。https://developer.atlassian.com/cloud/confluence/oauth-2-3lo-apps/#3—make-calls-to-the-api-using-the-access-token
最後にステップは cloud id の取得です。
こんな感じで cloud id を取得できます。
curl --request GET \
  --url https://api.atlassian.com/oauth/token/accessible-resources \
  --header 'Authorization: Bearer ACCESS_TOKEN' \
  --header 'Accept: application/json'
この cloud id を使って、api 叩くための url を作ります。
記事の取得
では実際に記事を取得してみます。 公式ドキュメント: https://developer.atlassian.com/cloud/confluence/rest/api-group-content/#api-wiki-rest-api-content-get
公式の exapmle をちょっと変えています。
# This code sample uses the 'requests' library:
# http://docs.python-requests.org
import requests
import json

cloud_id = "取得したcloud_id"

# url = "https://your-domain.atlassian.net/wiki/rest/api/content"
url = "https://api.atlassian.com/ex/confluence/{cloud_id}/rest/api/content"

headers = {
   "Accept": "application/json",
   "Authorization": "Bearer <access_token>"
}

response = requests.request(
   "GET",
   url,
   headers=headers
)

print(json.dumps(json.loads(response.text), sort_keys=True, indent=4, separators=(",", ": ")))
公式ドキュメントだと url が”https://your-domain.atlassian.net/wiki/rest/api/content”となっていますが、
your-domain を置き換えても”Unauthorized”になって終わります。
実際には cloud id を使って、上記のように url を作り、api 叩きます。
url 以外はドキュメントと同じです。
この例で、page が取得できます(blogpost は別)
記事の本文の取得
上記の API を叩いた方、気づいたと思いますが、記事の本文やコメント等の情報が取得できていません。
これは、別に指定する必要があります。
指定は expand パラメータを指定することで行います。
例えば、記事の本文を取得する際、次のような url が必要になります
url = "https://api.atlassian.com/ex/confluence/{cloud_id}/rest/api/content?expand=body.storage,body.view"このように、expand は複数指定でき、カンマでくぎります。(公式ドキュメント: https://developer.atlassian.com/server/confluence/expansions-in-the-rest-api/)
本文は複数のフォーマットがあって、細かいことは調べていないんですが、storage の方がサイズが小さく、view は html タグとかそのままの状態という雰囲気でした。
同様に、コメントも同時に取得したい時は次のようになります。
url = "https://api.atlassian.com/ex/confluence/{cloud_id}/rest/api/content?expand=body.storage,body.view,comment.body.storage"公式ドキュメントには書かれていない?っぽいですが、コメントも body 以下と同じような expand があるようで、コメント本文の取得には comment.body.storage(comment.body.view)が必要になります。
ページネーション
ページネーションは、クエリパラメータの start で管理されているようです。 また、直接次にアクセスすべきリンクも送ってくれています。 リクエストに成功した時、まだページがある場合、次の位置にあるリンクを叩くと、続きを貰えます。
{
    "_links": {
        "next": "リンク"
    }
}
簡易 Python confluence api クライアント
簡易な python confluence api クライアント書いたので載せときます。ご参考になれば。 https://gist.github.com/argonism/2a32691c1356526e6b892815c35f54da#file-confluence_api_client-py